Home Assistant – Futjitsu Futro S920
Install Home Assistant image on Debian and running it within a docker
This project started on 01 Dec. 2022
Raspberry Pis are good for Home Assistant application. They have low power consumption, but at the moment they are too expensive.
So I did a look into an alternative solution and found the thin client Fujitsu S920.
Below I would like to describe how I successfully installed the Home Assistant on it.
Equipment
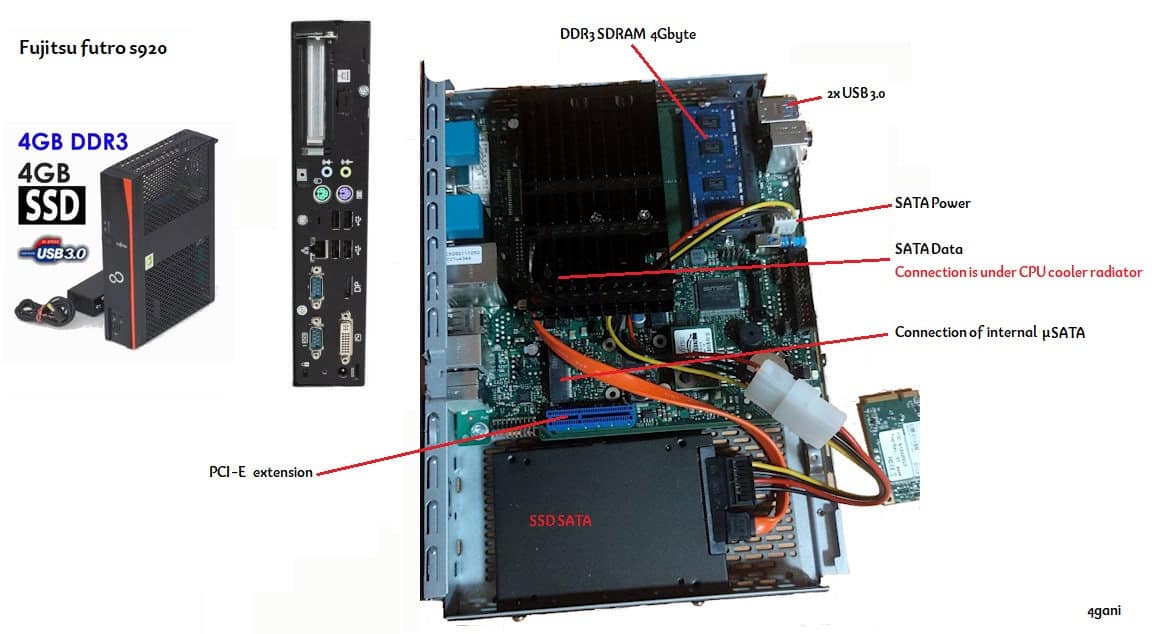
Model Fujitsu Futro S920
Memory: 4 GB DDR3-1600
Hard-disk: mSATA 8 GB. It’s not enough!
For Hassio installation will an SSD card at least 32 GB or more required.
Processor: AMD GX-222GC 15W 2.2GHz/ 2.4GHz 2CU 655MHz/ 800MHz
Preparing for OS Installation
removed Speaker
removed the smart card reader
removed internal mSATA 8GB and upgraded to a 128GB SATA/mSATA disk
(SATA data connector is under CPU cooler)
Download Debian live image
Download the debian latest live image for amd64 under (debian-live-11.5.0-amd64-standard.iso)
Next, download a tool for formatting and creating bootable USB flash drives: Rufus 3.21 Portable or any other tools
Connect a keyboard, monitor and a network cable (if there is no WLAN card in the computer) to the computer and complete the installation.
Debian configuration
log in as a root user ( super user)
apt update
dist-upgrade
Adding the created user entered by installation to the sudoer group (change the username to what you entered during installation)
usermod -aG sudo username
apt install openssh-server #(opessh-sftp-server)
systemctl status sshd
systemctl stop/start sshd
Manage the firewall. Let’s start with the minimum env. for main functionalities.
apt install ufw
ufw status
ufw status verbose
sudo ufw allow 22/tcp
sudo ufw allow 8123
sudo ufw allow 6052
sudo ufw enable
Check the IP-Address by command or read from fritz.box and remember it 192.168.178.xx
hostname -I | awk '{print $1}'Remote login via PuTTY
Open a terminal (for Linux) or a command line/PuTTy (for Windows) ssh [username]@[server IP]
apt update
apt dist-upgrade
apt autoremove
Install docker and dependencies over SSH using PuTTy:
apt-get install \
jq \
wget \
curl \
udisks \
libglib2.0-bin \
network-manager \
dbus \
systemd-journal-remote
/*  quickly installing the latest Docker-CE releases on the linux  */
curl -fsSL get.docker.com | sh
In order for a user who cannot run Docker correctly, the user must be added to the corresponding group account): root
sudo usermod -aG docker $(whoami)
Finally, restarts:
sudo reboot
When Docker installation is finished we check to see the version and test it:
docker --version
docker search hello-world
docker run hello-world
Setting up permissions To perform the installation:
We need to do the reboot again typing then:systemctl reboot
The moment to install Hassio with docker-compose
apt-get update
apt-get upgrade
apt-get install \
avahi-daemon \
apparmor
cd $home
apt-get install docker-compose
git clone https://github.com/postlund/hassio-compose.git
cd hassio-compose
$ echo "SUPERVISOR_SHARE=/home/$USER/hassio-config" > .env
docker-compose up
Starting Home Assistant for the first time
To connect to the device, just enter the address in the browser: http:[IP Address]:8123
The System Quick Start Wizard opens.
Install Home Assistant supervised dependencies.
(or you installing OS Agent)
Download the latest Debian package from OS Agent GitHub release
wget https://github.com/home-assistant/supervised-installer/releases/latest/download/homeassistant-supervised.deb
dpkg -i homeassistant-supervised.deb
Machine types: for AMD CPUs you select generic-x86-64.
docker container ls -a
ghcr.io/home-assistant/qemux86-64-homeassistant:2022.12.5 "/init"
ghcr.io/home-assistant/amd64-hassio-multicast:2022.02.0 "/init"
ghcr.io/home-assistant/amd64-hassio-audio:2022.07.0 "/init"
ghcr.io/home-assistant/amd64-hassio-dns:2022.04.1 "/init"
ghcr.io/home-assistant/amd64-hassio-cli:2022.11.0 "/init"
ghcr.io/home-assistant/amd64-hassio-supervisor:latest "/init"
ghcr.io/home-assistant/amd64-hassio-observer:2021.10.0 "/init"
hello-world
After it has finished running you should be able to access Home Assistant from:
http://your.ip.address.here:8123
Another alternative way to create containers
In your working directory example /home/my_user/
mkdir -p ./docker/homeassistant/ && mkdir -p ./docker/esphome/
Homeassistant container:
Create a file docker compose for homeassistant container:
vim ./docker/homeassistant/docker-compose.yml
Inside this file paste:
version: '3'
services:
  homeassistant:
    container_name: homeassistant
    image: "ghcr.io/home-assistant/home-assistant:stable"
    volumes:
      - /PATH_TO_YOUR_CONFIG:/config
      - /etc/localtime:/etc/localtime:ro
    restart: unless-stopped
    privileged: true
    network_mode: host
/PATH_TO_YOUR_CONFIG is the directory where we must mount the root volume of Home Assistant.
ESPHome container:
Create a file docker compose for ESPHome container:
vim ./docker/homeassistant/docker-compose.yml
Inside this file paste:
version: '3'
services:
  esphome:
    container_name: esphome
    image: esphome/esphome
    volumes:
      - /path/to/esphome/config:/config
      - /etc/localtime:/etc/localtime:ro
    restart: always
    privileged: true
    network_mode: host
/path/to/esphome/config is the directory where we must mount the config volume of ESPHOME.
Finally start containers with:
cd ./docker//
docker-compose up -d
HA IP_server: 8123
Esphome IP_server: 6052
some useful commands:
 docker --version
Docker version 20.10.21, build baeda1f

uname -a
lsb_release -a
docker ps
docker rm -f [Container_ID];
to purge all docker container and remove all stopped containers
containers, volumes, images
#!/usr/bin/env bash
docker stop $(docker ps -aq)
echo y | docker system prune
Configuration of Home Assistent ⮞
Not sure why you are stating that mSATA 8GB is not enough. I am running it on 8GB with no issued and free space is reported to be ~2GB. Probably only issue I will see for future – won’t be enough spacr for logs and data and I will beed to configure them to go to the SSD drive.
Basic install of Hassio is now around 30GB, 32GB is not really enough as you will frequently run out of disk space.